Editing Animations in UE5 - Clayton Jetton
Our game's goal for multi-state omnidirectional player locomotion requires a lot of work on animations. This has been a big learning experience considering I am not formally trained as an animator, nor was I extensively familiar with Unreal's animation tools at the start of this process. Things are progressing well now, but there were certainly a lot of hiccups that I imagine other novice animators / animation programmers will run into, so I'll try to talk about them in the order that I ran into them.
* Control Rig: Control rigs are a type of Unreal asset that helps facilitate the editing of animations by creating "controls" for bones that can be transformed and keyed. These controls are very modular and have a lot of options, like gizmo customization, that makes the editor's user experience a lot better. Control rigs also allow you to edit animations through IK bones which makes the whole process feel a lot more natural. Despite these nice features, I found myself having to abandon the use of control rig assets for several reasons.
1. Control rigs are complicated to build with no experience. By default, most skeletons do not come with a control rig asset, and the process of building controls for every bone in a skeleton, and also reversing the process to read the values of those controls is daunting for a control rig novice with limited time.
2. Control rigs introduce virtually undiagnosable issues into animations. The biggest time waster I experienced while using control rig assets was the experience that you can spend hours editing an animation in control rig, it looks good in the level sequencer, it looks good in the animation sequence preview, it looks good in the animation blueprint preview, but then in the PIE it looks completely different. I was never able to find the source of this issue, and this is what ultimately led me to the following alternative.
3. FK Control Rigs just work! An alternative to building your own control rig asset is having the engine auto-generate an FK control rig. As denoted by the name, the obvious drawback to this rig type is that it's not intended for editing with IK bones, but I would argue that that's not really a big deal because most of what you need to do with IK bones is handled on the programming side anyways. Since transitioning to this tool, after a brief learning curve, I have had a consistent and productive experience editing animations in Unreal.
* Post-Process Animation Blueprints: Some high-quality skeletal meshes, like the Unreal mannequin, have a post-process animation blueprint that handles the mesh's corrective bones. Corrective bones are extra bones on a skeleton whose sole purpose is to keep the mesh's skin from become distorted due to overstretched bones. Without these corrective bones, a mesh can end up looking stretched or twisted like a "candy wrapper". You must be careful to disable these blueprints when editing animations on these kinds of meshes, because when you bake changes to corrective bones those changes are additive. This can have an exponential effect of multiplying these corrective bones' key values until they are sticking out far from their original positions. So if you ever find that your mesh has pointy joints during certain animations, the post-process blueprint is probably the culprit, or more accurately you are the culprit for not disabling it.
* Additive Animations: Understanding how and when to use additive animations was a total game-changer for getting comfortable editing animations. I would honestly recommend this workflow to anyone trying to get into editing animations in Unreal:
1. Pick a "base animation" that you already like, but just need to make some changes to for your specific game's purposes.
2. Duplicate the base animation.
3. Bake the duplicate animation to an FK control rig
4. Turn off the post process blueprint on the mesh.
5. Attach any props you need to the skeleton for reference / move the mesh if in bad position (this does not mean edit bones)
6. Add an additive track to the control rig.
7. Auto key changes.
8. Ensure you are only editing the first frame of the animation.
9. Rotate bones until you have the desired pose.
10. Save.
11. Mark edited animation as local space additive, reference animation frame, select the first frame of your base animation.
12. In your animation blueprint, additively blend your edited animation as a single-frame animation onto your base animation.
While this workflow cannot achieve every animation need you may have in a game, it can accomplish many things, especially for locomotion.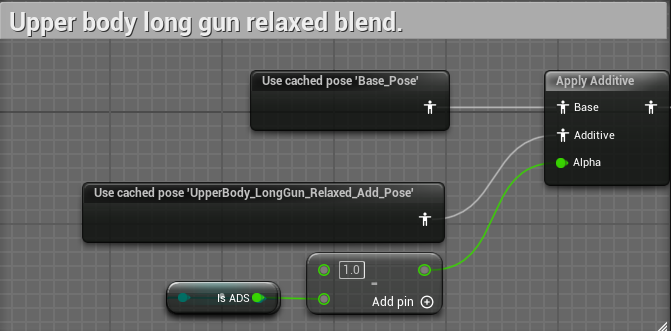
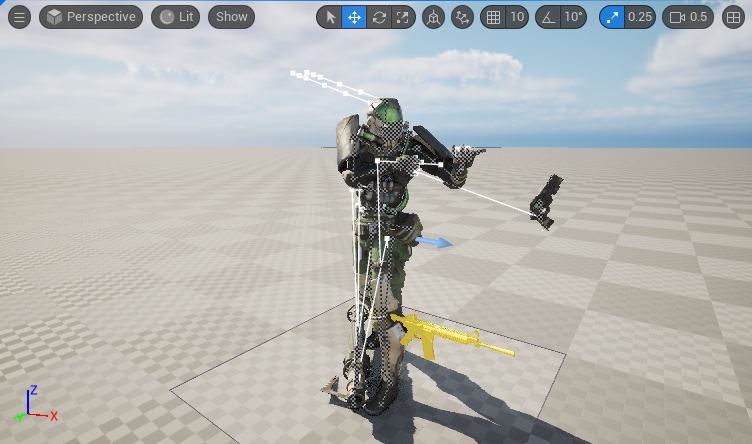
* Hand IK: Unreal makes IK easy, but only if you know how to use the tools provided. My favorite tool so far is the Two Bone IK node available in the Animation Graph. This node allows you to effect one bone with two different transforms. The affector target transform and the joint transform. The joint transform is kinda what it sounds like, and is just the parent bone that you want your affected bone to reference so that it doesn't get transformed into unnatural positions. The affector target is the target that we're trying to get our effected bone to copy. An example of how to use this is how I'm getting the player's off-hand to hold the barrel of his rifle. In this case, the affected bone is the left hand. The affector target would be the right hand, because we want the left hand to match the delta location and rotation of the right hand during animations. However, you may ask, "If we're matching the right hand, how do we get the left hand on the barrel?" The answer is to find the barrel's transform (I do this through a socket on the weapon's skeletal mesh), and put it into the bone space of the affector target. That way we can set the affector target's position as that of the barrel, while still feeding the IK information from the right hand bone. This has created the illusion that the player is actually holding rifles with his left hand.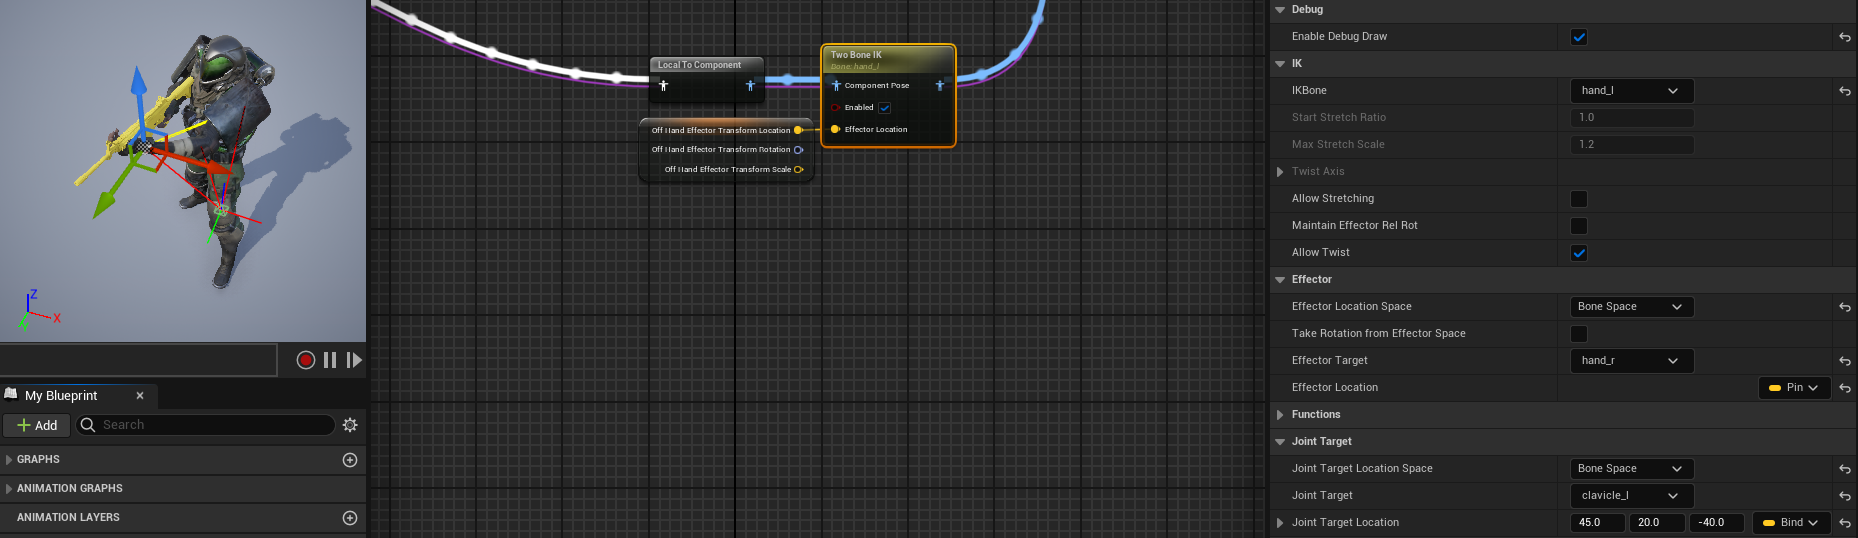
* Unwanted Bones in a Skeletal Mesh: Another issue I've ran into using free assets from the Unreal Marketplace is that many skeletal meshes come with props (weapons/gadgets) as a part of their skeletal mesh. This is an issue for game developer trying to use assets modularly. The solution to this is simple, though it did not occur to me immediately so I would like to share. Just scale the unwanted bones, or parents of those bones, down to 0. This effectively hides the bones, and if the skeleton is rigged reasonably, doesn't affect the rest of the skeleton.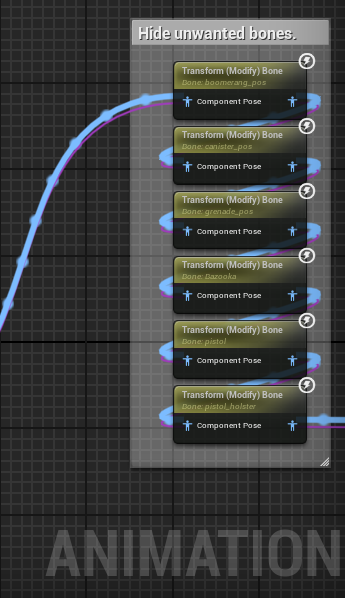
* Parallel State Machines: In the same vein of understanding the additive animation workflow, running parallel base and additive state machines is a very easy concept to build on. But you may find your animations behaving unexpectedly when you test, and I would say the #1 culprit, and the first place to check, is that your base and additive states are synced up. If you have the wrong additive playing on the wrong base, then you're essentially trying to blend two animations that don't go together, and this will yield weird results. To get this synchronization correct, and to have your state machines moving in the directions you desire, it may help you to better understand two concepts. Animation Event Responders and Transition Priority.
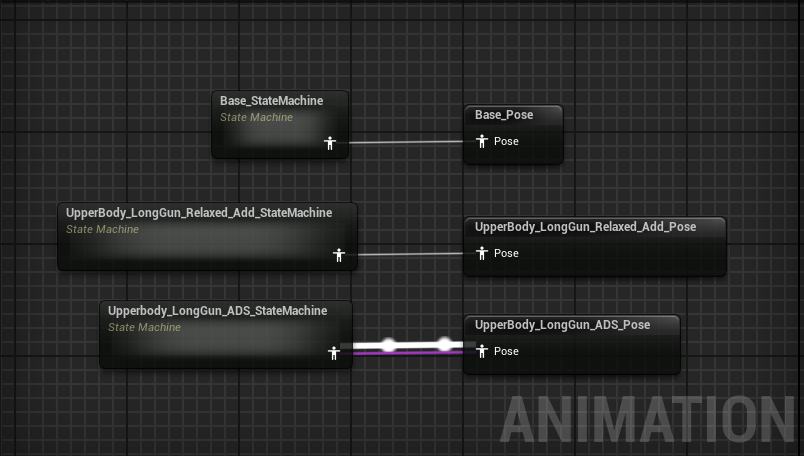
1. Animation Event Responders: Let's say you want your additive animation state machine to be in the same state that your base state machine is. How do you do this? Well you can know what sate your base machine is by reading its value On Update. Every animation state and state machine has three event dispatchers: On Initial Update, On Become Relevant, and On Update. The tool-tips explaining these are good, so I won't go into it, but I will give an example. For my additive state machines, I read the current state of the base state machine through a bound function to the On Update event dispatcher, and store that value in a variable. In my additive state machine's transitions, I check that variable as the condition for whether or not to transition to certain
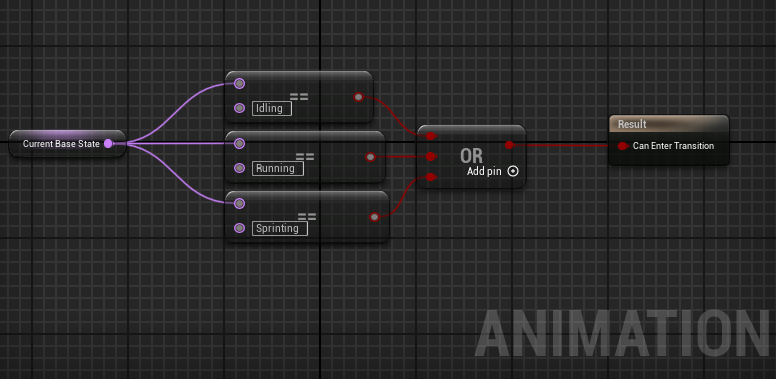
2. Transition Priority: In state machines every transition has a priority. Let's say from your walking forward state, you have transitions to stop walking forward and a transition to start walking in another direction. Well the conditions for these things happening may be true at the same time, but if you want to walk in another direction, you don't want to stop and then start. You just want to start. So you give the start higher priority than the stop. Problem solved.

Leave a comment
Log in with itch.io to leave a comment.